背景
小组同学最近在封装一组自定义的UIKit控件,目的是做到比UIKit更易用高性能,今天初步读了部分实现代码,发现以下细节:
//基于CoreGraphics根据传入的UIColor绘制并生成UIImage。
+ (UIImage *)imageWithColor:(UIColor *)color {
    CGRect rect = CGRectMake(0.0f, 0.0f, 1.0f, 1.0f);
    UIGraphicsBeginImageContext(rect.size);
    CGContextRef context = UIGraphicsGetCurrentContext();
    CGContextSetFillColorWithColor(context, [color CGColor]);
    CGContextFillRect(context, rect);
    UIImage *image = UIGraphicsGetImageFromCurrentImageContext();
    UIGraphicsEndImageContext();
    return image;
}
达到的目的就是用户只需要关注UIControlStateNormal和UIControlStateHighlighted状态下期望的background color,我们在内部来生成UIImage并通过setBackgroundImage:forState:来设置。(只适用于用户期望设置纯色背景的场景)
易用性做到了,性能方面却损失了。(我所遇到的)大多数卡顿场景的瓶颈往往在CPU,(在我之前的几篇关于优化性能的文章里有过讨论),而这段代码中的开辟内存空间,绘制内容再生成图片都是在CPU上进行,无疑是不理想的。那有没有更好的方案呢?
思路一:借助touch-delivery methods
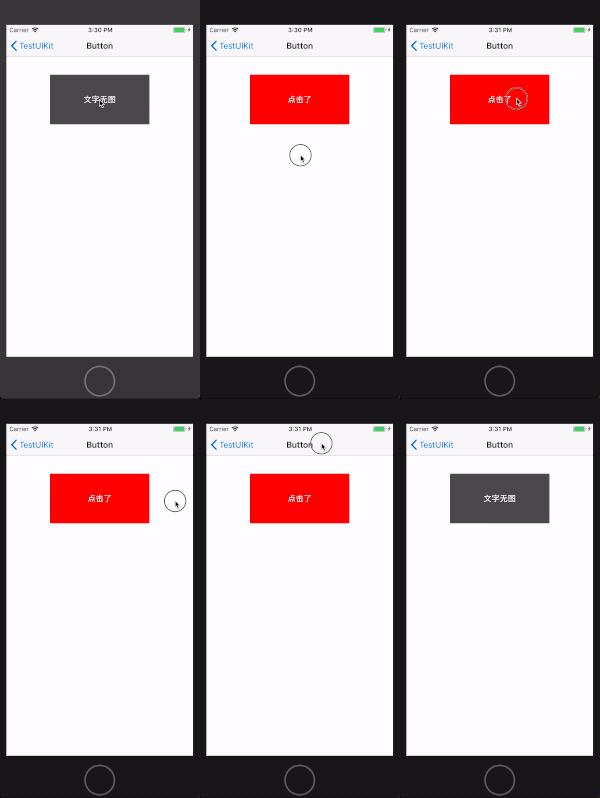
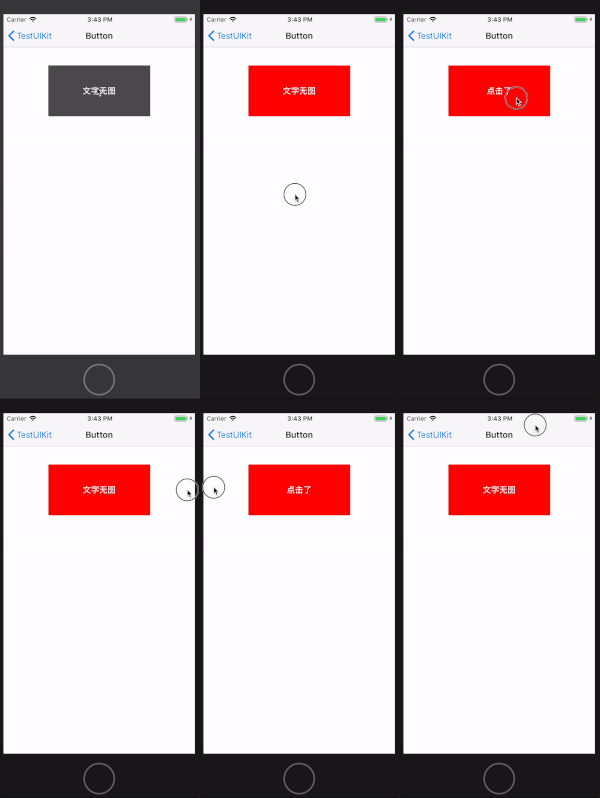
牵扯到触控状态的改变时,我们通常选择重写UIResponder的touchesBegan:withEvent:等方法,几行代码的事儿,但是run起来以后发现跟系统的UIControlStateHighlighted效果还是有不同的,这个在我之前探索iOS触控响应部分的时候就发现了,如下:
 |
 |
| 系统默认效果 | 我们实现的效果(注意Title因为是使用setTitle:forState:因此效果正常) |
也就是UIControlStateHighlighted效果是有个范围的,但是这个范围apple并没有告诉我们,那这个方案就不完美了。更进一步我想测测这个范围到底是多少,是不是有一定规律呢?三下五除二,发现不论UIButton的size是多大,这个范围大概是(70, 70.5, 70, 70),把这个范围控制逻辑写进touchesMoved:withEvent:,效果跟系统的就一致了!代码如下:
-(void)touchesBegan:(NSSet<UITouch *> *)touches withEvent:(UIEvent *)event {
    [super touchesBegan:touches withEvent:event];
    [self setBackgroundColor:self.backHighlightColor];
}

-(void)touchesMoved:(NSSet<UITouch *> *)touches withEvent:(UIEvent *)event {
    [super touchesMoved:touches withEvent:event];

    UITouch *touch = touches.anyObject;
    CGPoint location = [touch locationInView:[UIApplication sharedApplication].keyWindow];
    CGFloat locationX = location.x;
    CGFloat locationY = location.y;
    //这里默认UIButton的superView是撑满屏幕的,还需完善。
    CGFloat originX = self.frame.origin.x;
    CGFloat originY = self.frame.origin.y;
    CGFloat width = self.frame.size.width;
    CGFloat height = self.frame.size.height;
    BOOL xInScope = (locationX <= originX && originX - locationX < 70.5) || (locationX > originX && locationX - originX - width < 70);
    BOOL yInScope = (locationY <= originY && originY - locationY < 70) || (locationY > originY && locationY - originY - height < 70);
    if (xInScope && yInScope) {
        [self setBackgroundColor:self.backHighlightColor];
    }
    else {
        [self setBackgroundColor:self.backNormalColor];
    }
}

-(void)touchesEnded:(NSSet<UITouch *> *)touches withEvent:(UIEvent *)event {
    [super touchesEnded:touches withEvent:event];
    [self setBackgroundColor:self.backNormalColor];
}

-(void)touchesCancelled:(NSSet<UITouch *> *)touches withEvent:(UIEvent *)event {
    [super touchesCancelled:touches withEvent:event];
    [self setBackgroundColor:self.backNormalColor];
}
虽然效果一致了,但是显然并不能用于生产环境,因为(70, 70.5, 70, 70)这组边界值完全是我自己测量的,一是可能有些场景我没有覆盖到,二是指不定哪天apple就把这个值改变了,总之这个思路是不可靠的。
思路二:借助KVO观察UIButton的highlighted变化
经过思路一,我发现一定要寻找一个可靠的参考量。自然而然KVO涌上心头,代码如下:
[self addObserver:self forKeyPath:@"highlighted" options:NSKeyValueObservingOptionNew context:nil];

- (void)observeValueForKeyPath:(NSString *)keyPath ofObject:(id)object change:(NSDictionary<NSKeyValueChangeKey,id> *)change context:(void *)context {
    if ([keyPath isEqualToString:@"highlighted"]) {
        BOOL highlighted = change[NSKeyValueChangeNewKey];
        UIColor *backgroundColor = highlighted ? self.backHighlightColor : self.backNormalColor;
        [self setBackgroundColor:backgroundColor];
        }
}
经过测试,跟思路一有同样的问题,highlighted属性在touchDown之后touchEnd之前一直都是YES,也忽略了范围条件。
思路三:借助KVO观察UIButton上的backgroundImageView的image变化
还是没有找到可靠而又准确的参考量,再想想,其实我们直观看到的就是最准确的,UIButton是随着UIControlStateNormal和UIControlStateHighlighted的变化来切换UIImageView的image(经验证这部分逻辑在UIButton的touchesMoved:withEvent:中),通过观察视图层级我们得知UIButton上有两个UIImageView和一个UILabel,分别来承载UIButton的title、image和backgroundImage,那么承载backgroundImage的那个UIImageView的image属性就是我们要找的那个可靠而又准确的参考量。
突破点有了,整理思路如下:
1、触发UIButton添加所需的background UIImageView
当我们调用UIButton的setBackgroundImage:forState:时,UIButton就会addSubview:所需的UIImageView(如需),同理setImage:forState:以及setTitle:forState都有类似的逻辑,当UIButton上有多个UIImageView时我们就不容易区分它们了,因此我们的思路就是尽早的触发setBackgroundImage:forState:便于锁定我们的目标UIImageView,代码如下:
- (instancetype)initWithFrame:(CGRect)frame
{
    self = [super initWithFrame:frame];
    if (self) {
        //保证最先执行
        //zombie_normal(1px x 1px)和zombie_highlighted(1px x 2px)为两张透明的占位图。
        self.buttonBackgroundNormalImage = [UIImage imageNamed:@"zombie_normal"];
        self.buttonBackgroundHighlightedImage = [UIImage imageNamed:@"zombie_highlighted"];
        [self setBackgroundImage:self.buttonBackgroundNormalImage forState:UIControlStateNormal];
        [self setBackgroundImage:self.buttonBackgroundHighlightedImage forState:UIControlStateHighlighted];
        [self setNeedsLayout];
        [self layoutIfNeeded];
    }
    return self;
}

/*
 * 重写以达到记录用户设置的background image
 */
- (void)setBackgroundImage:(UIImage *)image forState:(UIControlState)state {
    [super setBackgroundImage:image forState:state];
    if (state == UIControlStateNormal) {
        _buttonBackgroundNormalImage = image;
    }
    else if (state == UIControlStateHighlighted) {
        _buttonBackgroundHighlightedImage = image;
    }
}
2、锁定background UIImageView
触发addSubview:之后,紧接着就是锁定这个被添加的UIImageView。
-(void)layoutSubviews {
    [super layoutSubviews];
    [self findBackgroundImageView];
}

- (void)findBackgroundImageView {
    //不考虑用户去主动移除UIButton上的UIImageView,那么这个UIImageView一经确定就不会改变了。
    if (self.buttonBackgroundImageView) {
        return;
    }
    for (UIView *subview in self.subviews) {
        if ([subview isMemberOfClass:[UIImageView class]]) {
            self.buttonBackgroundImageView = (UIImageView*)subview;
            break;
        }
    }

    、、、
}
3、添加KVO跟踪变化
锁定之后,添加KVO观察其image属性的变化,根据不同的image设置不同的background color。
static void * BackgroundImageViewContext = &BackgroundImageViewContext;

- (void)findBackgroundImageView {
    、、、

    @try {
        [self.buttonBackgroundImageView removeObserver:self forKeyPath:@"image" context:BackgroundImageViewContext];
    } @catch (NSException *exception) {
    }
    [self.buttonBackgroundImageView addObserver:self forKeyPath:@"image" options:NSKeyValueObservingOptionNew context:BackgroundImageViewContext];
}

- (void)observeValueForKeyPath:(NSString *)keyPath ofObject:(id)object change:(NSDictionary<NSKeyValueChangeKey,id> *)change context:(void *)context {
    if (context == BackgroundImageViewContext && [keyPath isEqualToString:@"image"]) {
        UIImage *newImage = change[NSKeyValueChangeNewKey];
        if ([newImage isEqual:self.buttonBackgroundNormalImage]) {
            [self setBackgroundColor:self.backNormalColor];
        }
        else if ([newImage isEqual:self.buttonBackgroundHighlightedImage]) {
            [self setBackgroundColor:self.backHighlightColor];
        }
    }
}
这样就达到了我们的目的,满足易用性并兼顾性能。
一次有趣的探索,感谢阅读~